Table of Contents
Tap the light button on your makeup mirror, and the same blush can look a little different. The warm setting adds a yellow cast; the cool setting gives your face a cooler appearance. Which one should you use before reaching for your foundation?
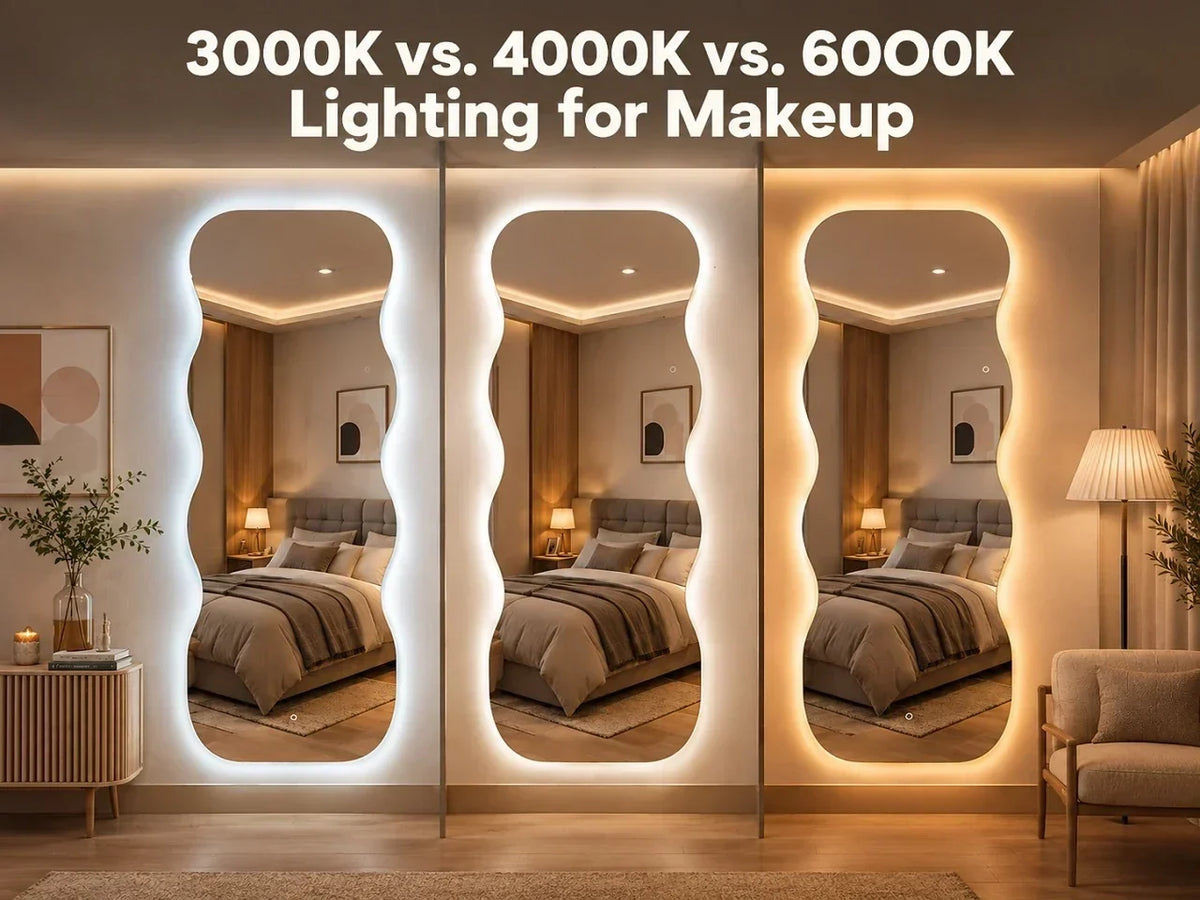
For everyday makeup, 4000K is a practical starting point among these three settings. Use 3000K to preview your look under warm indoor light and 6000K for a cooler comparison. None of them tells the whole story on its own—brightness, color rendering, and shadows also affect what you see.
This Hasipu guide breaks down 3000K vs. 4000K vs. 6000K lighting for makeup, with simple ways to choose your everyday setting and check your finished look before heading out.
3000K vs. 4000K vs. 6000K at a Glance
| Comparison | 3000K Lighting | 4000K Lighting | 6000K Lighting |
|---|---|---|---|
| Light appearance | Warm white with a yellowish cast | Balanced white between warm and cool | Cool white with a bluish cast |
| Suggested use | Previewing makeup for warm indoor settings | A practical starting point for everyday makeup | Checking how makeup looks under cooler light |
| Foundation check | Compare with another setting before deciding on a shade | Check blending along the jawline and neck | Use as an additional check, especially alongside indirect daylight |
| Blush and lipstick | Warm light can change how the colors appear | Useful for judging overall color balance when color rendering is good | Offers a cooler comparison before making adjustments |
| Evening makeup | Useful for a warm-light preview; actual venue lighting will vary | Apply and blend before checking the warm setting | Helpful when the destination has cooler lighting |
| Daytime makeup | Avoid relying on this setting alone | Apply makeup, then check near a window | Daylight-like in appearance, but does not reproduce every daylight condition |
| Brightness | Depends on the light output and dimmer setting | Depends on the light output and dimmer setting | A higher Kelvin number does not mean more brightness |
| Color accuracy | Depends on color rendering, not warmth alone | A neutral appearance does not guarantee accurate colors | A daylight label does not guarantee accurate colors |
| Main limitation | A warm-only check may miss differences visible in other lighting | Cannot compensate for poor color rendering or facial shadows | Can look noticeably cool; should not be your only reference |
| Recommended role | Warm-light preview | Everyday application starting point | Cool-light comparison |
These suggested uses assume reasonably good color rendering and similar illumination on your face. A poorly positioned 4000K light can be less useful than an evenly diffused 3000K or 6000K setup.

What Does Kelvin Mean on a Makeup Mirror?
Kelvin, shown as K, describes the warm-to-cool appearance of white light. A lower number looks warmer; a higher number looks cooler.
It does not tell you how bright a mirror is. Lumens describe light output, while the illumination reaching your face also depends on distance, direction, and fixture design. Turning a mirror from 3000K to 6000K changes its color setting; it does not automatically double its brightness. These distinctions are explained in the University of Florida’s guide to LED lighting.
There is another number worth checking: the color rendering index, or CRI. Color temperature describes the light’s appearance. CRI helps describe how faithfully it renders object colors compared with a reference source.
Two lights labeled 4000K can still make the same lipstick look different. That is why choosing the best lighting for makeup takes more than finding a particular number on the box.
3000K: Useful for an Evening Makeup Check
3000K makeup lighting has a warm cast that makes sense for a bedroom vanity or a final check before heading into warmly lit surroundings.
Picture getting ready for dinner. You have already blended your foundation and checked your blush under your usual application light. Switching to 3000K gives you another view of the look before you leave.
Treat it as a preview, though. A restaurant may have dimmer lights, warmer bulbs, or colored walls that change what you see.
Warm light is not inherently inaccurate. A well-made 3000K light can have excellent color rendering. The limitation is relying on that one warm environment to predict how your makeup will look everywhere else.
For a new foundation shade, compare the jawline and neck under another light before deciding the match is right. Avoid adding more blush or changing your base just to make it look perfect in one setting.
Use 3000K to check an evening look after application, especially when you expect to spend time in warm indoor lighting.
Why Start With 4000K for Everyday Makeup?
For this three-way comparison, 4000K lighting for makeup is a sensible middle setting. It has less yellow warmth than 3000K without the cooler appearance of 6000K.
Try it as your regular application light for a week. Keep your mirror position and brightness fairly consistent, then check the finished result near a window when available. That gives you a useful routine for spotting recurring issues, such as an unblended jawline or uneven blush placement.
This recommendation comes from its middle-ground appearance and usefulness as a consistent starting point. It does not mean exactly 4000K is best for every face or every room.
A different neutral setting can work, too. A mirror with a 4500K middle mode is not automatically a worse choice. The whole setup matters more than hitting one exact Kelvin number.
During application, check:
- The edge of your foundation along your jaw.
- Product collecting around your nose.
- Concealer blending beneath both eyes.
- Blush placement on each cheek.
Look for visible edges and uneven placement before adding another layer. Sometimes the fix is a little more blending, not more coverage.
6000K Gives You a Cooler View
6000K lighting has a cooler white appearance and is often described as daylight-like. It can be useful for comparing your finished makeup with the warmer view you get from 3000K.
The word “daylight” needs some context. Outdoor light changes with the weather, time of day, and whether you are in direct sun or shade. An LED’s Kelvin label does not tell you that its spectrum matches daylight.
Use the cooler mode as a second look. Check your blending, turn your head slightly, and compare both sides of your face. Keep the light comfortably bright.
Do not assume 6000K reveals more detail simply because it looks cooler. Detail visibility also depends on illumination, contrast, and the direction of the light. A harsh setup can come from exposed LEDs or excessive brightness at any color temperature.
For daytime makeup, a brief check facing a window in indirect daylight adds another useful reference. Avoid a stripe of direct sunlight across one cheek.
Treat 6000K as a comparison setting, rather than proof that your makeup will look exactly the same outdoors.

The Kelvin Number Cannot Fix Bad Lighting
Look for color quality For makeup mirror lighting, a published CRI of 90 or higher is a useful shopping target. The U.S. Department of Energy describes that range as excellent color fidelity, while also noting that CRI has limitations, particularly for saturated reds.
A high number helps, but it is not a guarantee that every cosmetic shade will look identical under every light. Read the Department of Energy’s explanation of LED color quality.
Check the specifications for the exact model. “Natural light” and “daylight mode” are not substitutes for a documented CRI rating.
Bring the light toward your face A ceiling light may illuminate the bathroom while leaving shadows around your eyes and beneath your nose. Before adding concealer, check whether changing your position changes the darkness you see.
Aim for diffused light reaching both sides of your face. A front-lit mirror or balanced side lighting can help. Lighting around the wall behind a mirror may create a pleasant glow, but check how much light actually reaches your face.
Sit centered at the mirror with your face comfortably visible. Leaning far to one side makes it harder to compare your cheeks.
Adjust brightness separately Start at a moderate setting and raise it until you can see your blending clearly without squinting.
Check your makeup again at ordinary room brightness before leaving. Maximum output is not a requirement for a useful mirror, especially when you sit close to it.
A dimmer gives you room to adjust for different conditions. Your preferred setting on a dark morning may feel excessive when daylight fills the room.
Watch the other lights in the room A warm lamp on your left and cool window light on your right can make the two sides of your face look different. Before correcting “uneven” makeup, simplify the lighting.
Turn off a competing lamp or reposition the mirror. Give yourself a moment to adjust after changing modes, then inspect the look again.
Keeping your setup consistent also makes it easier to judge a new foundation or blush. Changing the product, brightness, and light color at the same time makes comparisons harder.
A Simple Routine for a Hasipu Lighted Mirror
Many Hasipu LED mirror models offer adjustable brightness and multiple light colors. Available functions vary by product, as noted in the Hasipu mirror FAQ.
Check your model’s listed settings instead of assuming every mirror uses 3000K, 4000K, and 6000K.
With an adjustable model, try this routine:
- Apply under the middle setting. Start with the neutral mode available on your mirror and choose comfortable brightness.
- Inspect the whole face. Check the jawline, hairline, and both cheeks at normal viewing distance.
- Preview the destination. Try warm light for a warm indoor setting or cool light for a cooler comparison.
- Make small corrections. Blend a visible edge or soften an uneven patch. Avoid rebuilding your makeup after every mode change.
Shopping for a new setup? Browse Hasipu vanity mirrors with lights, then compare each model’s dimensions, lighting controls, and published specifications.
Choose a size that lets you see your full face comfortably from your usual seat. Easy-to-reach controls are useful when you want to check another light setting without interrupting your routine.
Find Your Everyday Makeup Light
You do not need all three light colors to get your makeup right. One well-positioned light with good color rendering and comfortable brightness can be enough for your daily routine.
Start with 4000K for everyday application, then use 3000K or 6000K for a quick comparison when those settings are available. Warm light can help you preview an evening look; cooler light gives you another view of your blending. Make small corrections instead of chasing a perfect match under every setting.
With an adjustable Hasipu mirror, choose the mode that helps you see clearly, check your finished makeup in the lighting you expect to wear it in, and leave it there. You should not need to redo your blush every time you tap the light button.

Frequently Asked Questions
1. Is 3000K or 4000K better for makeup?
Between the two, start with 4000K for everyday application because it has less of a warm cast. Use 3000K to check a look for warm indoor surroundings. Good color rendering and even facial lighting remain essential.
2. Is 6000K too cool for applying makeup?
Not necessarily. A diffused, color-accurate 6000K light can be usable for application. Compare the result under another light, and adjust brightness separately when the setup feels glaring.
3. Is warm or cool light better for foundation matching?
Avoid judging a new foundation only under one strongly warm or cool light. Start with an evenly lit, high-quality setup and compare the shade along your jaw and neck under indirect daylight. Check it again after the product has settled according to its directions.
4. Is 4000K the same as natural daylight?
No. It describes a light’s color appearance, not a complete match to natural daylight. Daylight varies throughout the day, and lights with the same Kelvin rating can render makeup colors differently.
5. Does every skin tone need a different Kelvin setting?
Skin tone alone is not a sound reason to assign someone a particular setting. Use consistent lighting with good color rendering, then evaluate your own makeup in the settings where you wear it.